
Installing Python for generative AI
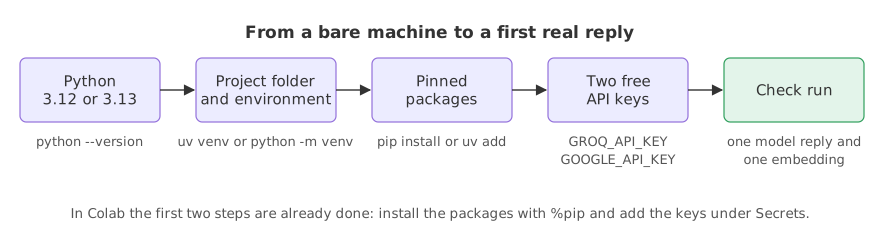
Setting up Python for generative AI means installing Python 3.12 or 3.13, creating a project environment, installing five pinned packages and adding two free API keys: a Groq key for the chat model and a Google key for embeddings.
Last updated: 08 Oct, 2026 · LangChain 1.4 · LangGraph 1.2 · Python 3.12 or 3.13
Every example in the course runs on this setup, so the versions below are the ones the lessons were run with. The video sets up with uv. The tabs show pip, uv and Google Colab, which needs nothing installed on your machine.
Checking your Python version
The packages need Python 3.10 or newer, and the lessons were run on 3.12 and 3.13. In a terminal, the command is python --version, or python3 --version on macOS and Linux. From inside Python:
import sys

print(sys.version.split()[0])
print("ok" if sys.version_info >= (3, 10) else "too old")3.12.13 ok
A lower number means installing a newer Python from python.org, or letting uv do it with uv python install 3.13.
Creating a project folder and an environment
The video uses uv, a package and project manager written in Rust. uv init turns the folder into a project and writes pyproject.toml, a .python-version file (3.13 in the video) and a starter main.py. uv venv creates the environment in a .venv folder. The video works on Windows, so it activates the environment with .venv\Scripts\activate; on macOS and Linux the command is source .venv/bin/activate.
An environment is a private copy of Python for one project, so the packages of one project never disturb another. Pick the tab that suits you.
python -m venv .venv
source .venv/bin/activate        # Windows: .venv\Scripts\activate
Installing the pinned packages
The video lists its libraries in a requirements.txt file, installs them with uv add -r requirements.txt and then opens pyproject.toml to read the versions that were installed: langchain 1.1.0 was the newest release then. That is the reason to pin. LangChain moves quickly, and a call that works on one version can be renamed on the next, so the tabs below fix the versions every lesson here was run with.
The video also installs langchain-openai and langchain-community, for OpenAI models and older integrations. This course uses Groq and Gemini, which have free keys, so those two packages are left out.
pip install "langchain==1.4.3" "langchain-groq==1.1.3" "langchain-google-genai==4.4.0" "langgraph==1.2.14" "python-dotenv==1.2.4"What each package does
langchainholdsinit_chat_model, the message classes, tools andcreate_agent. The next part of the course uses it from the first model call.langchain-groqconnects LangChain to the models Groq hosts.langchain-google-genaidoes the same for Gemini chat models and for Gemini embeddings.langgraphruns the agents that LangChain builds and saves their memory.langchain-corecomes withlangchainand defines the shared types.python-dotenvloads your keys from a.envfile. Lessons that need more, such as a PDF reader or a vector store, name their packages where they first use them.
Reading the installed versions
Run this to confirm the install matches the pins. The version of langchain-core was not pinned: it arrives with langchain.
from importlib.metadata import version

for name in ["langchain", "langchain-core", "langchain-groq", "langchain-google-genai", "langgraph", "python-dotenv"]:
print(name, version(name))langchain 1.4.3 langchain-core 1.6.7 langchain-groq 1.1.3 langchain-google-genai 4.4.0 langgraph 1.2.14 python-dotenv 1.2.4
Getting a Groq keyCourse key
Groq hosts the chat model used throughout the course, openai/gpt-oss-120b. Open console.groq.com/keys, sign in, choose Create API Key, name it and copy it. The free plan needs no card. It limits requests and tokens per minute and per day, and the limits page in the Groq console shows yours; a long prompt or many calls in a row can reach them.
Getting a Google keyCourse key
The Google key serves two purposes: Gemini embeddings (gemini-embedding-001), which the RAG lessons use to search documents, and gemini-2.5-flash-lite as a second chat model. Open aistudio.google.com/apikey, choose Create API key and copy it. The free tier needs no card.
| Variable | Used for | Where to get it |
|---|---|---|
GROQ_API_KEY | Chat replies from openai/gpt-oss-120b | console.groq.com/keys |
GOOGLE_API_KEY | Embeddings, and gemini-2.5-flash-lite as a second chat model | aistudio.google.com/apikey |
A Tavily key for web searchOptional
The video's research agent searches the web with Tavily. The key is free, includes 1,000 credits a month and needs no card, and it is read from TAVILY_API_KEY. Install the package with pip install "langchain-tavily==0.2.18" only when you reach Project: a research agent, which first uses it and runs a real search. Every other example in the course runs without it.
Setting the keys
Set the keys before you run any model example. The three tabs set them for one terminal session, or for one Colab notebook.
export GROQ_API_KEY="gsk_..."
export GOOGLE_API_KEY="AIza..."
Keeping the keys in a .env file
export lasts for one terminal window. A file named .env in the project folder keeps the keys, and python-dotenv copies them into the environment when a script starts. The video does the same with load_dotenv().
GROQ_API_KEY=gsk_...
GOOGLE_API_KEY=AIza...from dotenv import load_dotenv
load_dotenv() # copies the keys in .env into the environmentCall it before any model is created. Add .env to your .gitignore so the keys never reach a Git repository.
Checking both keys with one real run
One call to each of the three model strings the course uses, and one embedding. If a key is missing or wrong, this is where you find out. init_chat_model and invoke are explained in Your first LLM app; here they only prove that the keys work.
from dotenv import load_dotenv
from langchain.chat_models import init_chat_model
from langchain_google_genai import GoogleGenerativeAIEmbeddings

load_dotenv()
for name in ["groq:openai/gpt-oss-120b", "groq:openai/gpt-oss-20b", "google_genai:gemini-2.5-flash-lite"]:
    model = init_chat_model(name)
    print(name, "->", model.invoke("Reply with the single word: ready").text)

embedder = GoogleGenerativeAIEmbeddings(model="gemini-embedding-001")
print(len(embedder.embed_query("hello")), "numbers in one embedding")groq:openai/gpt-oss-120b -> ready groq:openai/gpt-oss-20b -> ready google_genai:gemini-2.5-flash-lite -> ready 3072 numbers in one embedding
Reading the check run
- The first two lines come from Groq, so
GROQ_API_KEYworks and both Groq models answer.openai/gpt-oss-20bis the smaller fallback if the larger model is busy or you reach a rate limit. - The third line comes from Gemini, so
GOOGLE_API_KEYworks for chat. - The last line is the length of one embedding: a list of numbers that stands for the text
hello. The RAG lessons compare such lists to find the passages closest in meaning to a question.
Fixing the four errors you will meet first
No key found
The most common failure. The variable is not set in the terminal or notebook that runs the code. The example removes the keys from the environment to reproduce it.
import os
from unittest import mock
from langchain.chat_models import init_chat_model

with mock.patch.dict(os.environ, {}, clear=True):   # an environment with no keys, as on a fresh machine
init_chat_model("groq:openai/gpt-oss-120b")Traceback (most recent call last):
File "main.py", line 6, in <module>
init_chat_model("groq:openai/gpt-oss-120b")
groq.GroqError: The api_key client option must be set either by passing api_key to the client or by setting the GROQ_API_KEY environment variableExport the key in the same terminal that runs the script, or call load_dotenv() first. In a notebook, restart the kernel after changing the environment.
A wrong key
A key that is mistyped, revoked or from another provider reaches Groq and is refused with status 401.
from langchain.chat_models import init_chat_model

model = init_chat_model("groq:openai/gpt-oss-120b", api_key="gsk_not_a_real_key")
model.invoke("hello")Traceback (most recent call last):
File "main.py", line 4, in <module>
model.invoke("hello")
groq.AuthenticationError: Error code: 401 - {'error': {'message': 'Invalid API Key', 'type': 'invalid_request_error', 'code': 'invalid_api_key'}}Copy the key again from the console, without quotes or spaces around it.
A model that no longer exists
The video's Groq examples use qwen/qwen3-32b. Groq has retired it, so the call is refused.
from langchain.chat_models import init_chat_model

retired = "qwen3-32b"    # the Groq model the video uses
model = init_chat_model(f"groq:qwen/{retired}")
model.invoke("hello")Traceback (most recent call last):
File "main.py", line 5, in <module>
model.invoke("hello")
groq.NotFoundError: Error code: 404 - {'error': {'message': 'The model `qwen/qwen3-32b` does not exist or you do not have access to it.', 'type': 'invalid_request_error', 'code': 'model_not_found'}}Groq's deprecations page names the replacement for each retired model. This course uses openai/gpt-oss-120b.
A package that is not installed
The video's notebooks import langchain_openai. The packages installed above do not include it.
import langchain_openaiTraceback (most recent call last):
File "main.py", line 1, in <module>
import langchain_openai
ModuleNotFoundError: No module named 'langchain_openai'Install a missing package into the same environment that runs the code. langchain-openai is only for OpenAI models, which need a paid key.
pip vs uv vs Colab
| pip | uv | Colab | |
|---|---|---|---|
| Installs into | The active Python environment | The project's own .venv | The notebook's runtime |
| Keys set with | export, $env: or .env | export, $env: or .env | Secrets and userdata.get |
| Best for | A quick start with the Python you have | A project you keep, with versions recorded in pyproject.toml | Nothing installed on your machine |
Where you use this setup
- Every model example in the course: the same environment and the same two keys.
- A project you keep:
pyproject.tomlorrequirements.txtrecords the pinned versions, so a teammate or a server installs the same ones. - A notebook in Colab: the
%pipline at the top and the two Secrets are the whole setup.
pip can belong to a different Python than the one that runs your code, and the install then looks fine but the import fails. Install with python -m pip install ... so the two match, or %pip in a notebook.Related
- Previous: Generative AI and agentic AI
- Next: What is generative AI
- Reference: Install LangChain
- Remove
GOOGLE_API_KEYfrom your environment and run the check. Which line fails first, and what does the error name? - Change the prompt in the check to
Reply with the single word: pongand run it again. - Run
python -m pip listand compare the five pinned packages with the version printout.
Little by little, you're building something great.